Thursday, October 13, 2011

Guest Post - Spaghetti Squash!

One fun thing about being a foodie is having friends who are also foodies! I asked one of my best friends Kristy to write and share the post below. She is a vegetarian and has a way of making wonderful vegetarian food that tastes delcious and is so filling.

~~~~~~~~~~~~~~~~~~~~~~~~~~~~~~~~~~~~~~~~~~~~~~~~~~~~~
Fall is in full effect, which means some of the tastiest veggies are in season. One of my favorite vegetables is squash, and there are so many varieties to choose from. There are several kinds of squash I haven’t tried yet, but as of now my favorite is spaghetti squash. It’s easy to prepare, extremely nutritious and you can use the veggie itself as a serving dish!!  

This particular recipe was created by our lovely friend Chloe. She made it for me one night, and I’ve been hooked ever since. The best part about this recipe (aside from its deliciousness) is that it’s flexible. You can add or omit ingredients based on preference, and it doesn’t require precise measurements.  So, go ahead and get creative with this one! These are the ingredients I always include, but the possibilities are endless! If you’ve never had tempeh, I highly recommend trying it. It’s a product derived from soybeans, similar to tofu, but it’s higher in protein, fiber and vitamins, has a firmer texture and an earthy flavor.

Spaghetti Squash Bowls
1 large spaghetti  squash, halved
Minced garlic
1 can chopped fire roasted tomatoes (the fire roasted ones add a lot of flavor!)
½ can chickpeas
2 cups spinach (frozen)
½ block tempeh
Teriyaki or stir fry sauce
Feta cheese
Begin by preheating your oven to 350 degrees. Cut the spaghetti squash in half lengthwise (leave the skin on, no need to peel), and scoop out the seeds and pulp with a small spoon so you’re left with two “bowls.” Bake the two halves for about 30-45 minutes on a cookie sheet, turning them over halfway through. You’ll know they’re done when the inside is soft enough to easily poke a fork through. 

While the squash is baking, heat a small amount of olive oil and minced garlic in a large skillet. Place tomatoes, chickpeas and spinach in skillet and simmer on low heat for about 20 minutes, stirring frequently until the liquid consistency disappears.While the mixture is simmering, cut tempeh into small, bite size pieces. Heat olive oil in a small skillet on low to medium heat. Sautee tempeh slices for 8-10 minutes, until heated through. Pour a generous amount of teriyaki sauce on the tempeh and let simmer for a few more minutes. Stir tempeh slices into the spinach and tomato mixture.


When squash is done baking, allow the halves to cool for a few minutes. Then fill the squash “bowls” with the spinach, tomato, chickpea and tempeh mixture. Sprinkle a generous amount of feta cheese on each bowl and serve hot. While eating, use your fork to scrape the squash away from the skin, so it becomes part of the mixture. Enjoy! 

Monday, September 19, 2011

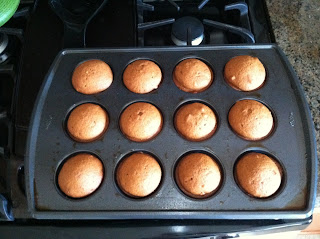
Easy and Delicious Pumpkin Bread!

Every year when summer comes to an end, I am always sad and slightly reluctant to welcome in the fall. However, this year we had such an insanely hot summer in VA, I was surprisingly happy to feel the cooler weather. I do have to admit fall does bring some pretty awesome things; football, fall fashion, pumpkin spiced lattes, beautiful changing leaves and of course delicious seasonal recipes. I am not much of a baker (too many exact measurements for my style) but in my new found excitement for the season, I found this wonderful recipe. With a few small changes I turned it into a healthier recipe that was absolutely delicious and reminiscent of all things fall.


Pumpkin Bread (or muffins in this case)
- 1 1/2 cups sugar (I only used one to cut back on the sugar and they were still amazing. If you are comfortable with splenda you can use that too - I am slightly afraid of the stuff)
- 2 eggs
- 1/4 t baking powder
- 1 t baking soda
- 3/4 t salt
- 1/2 t cloves (I substituted all spice here)
- 1/2 t cinnamon
- 1/2 t nutmeg
- 1 2/3 c flour (I used half whole wheat and half all purpose)
- 1/2 c oil (you can substitute applesauce but I went with canola oil here)
- 1/2 c cold water
- 1 cup pureed pumpkin (make your own or use store bought)
- 1/2 c walnuts (the recipe did not call for this, but I had some in the pantry and thought they would be a nice add-in)

The best part about this recipe? You simply mix all of these ingredients together in one bowl, pour into a greased pan and bake at 325 degrees.
Bread (one loaf) = 75-90 minutes
12 muffins = 45 minutes
24 mini muffins = 25 minutes

I made 12 muffins and they were absolutely delicious!! I love that you can really adjust this recipe based on your preferences and what you have around the house. This is an inexpensive recipe and has lots of antioxidants from the spices, pumpkin and walnuts. A nice side benefit to making these is that your house will smell like fall all day!

Happy Eating!

Sunday, August 14, 2011

Barley Salad with Basil, Tomato and Feta

Barley is a grain that I have not cooked with much, but I continuously see it mentioned on lists of healthy foods to try. Apparently this versatile powerhouse is a great source of niacin, fiber, selenium and manganese all of which help to protect against heart disease and cancer, making it the perfect substitute for basic brown rice. For the sake of convenience, I tried to find the quick cooking kind but naturally my grocery store did not carry it. The one bad thing about Barley? It takes forever to cook. But I really wanted to try this salad, so I figured the long 50 minute cooking time would be less painful on a Sunday evening.
 

Dressing
- 3 tablespoons red wine vinegar
- 3 tablespoons fresh lemon juice
- 1 tsp honey
- 1/4 cup olive oil
Mix first 3 ingredients together in a bowl. Gradually whisk in olive oil. Season dressing with a little salt & pepper.
Salad
- 1 1/2 cups cooked barley, cooled (cook according to package directions and allow it to cool a bit)
- 2 cups cherry tomatoes, cut in half
- about a cup of roughly chopped basil
- about a cup chopped scallions
- 1 7 oz package feta cheese
Mix the cooked barley with all other ingredients and top with dressing. Serve at room temperature.


I decided Greek style salmon would go well with this. I simply sprinkled salmon fillets with Greek seasonings and roasted at 400 for about 12 minutes (I have a pre-made Greek seasoning spice mix, but you can create your own at home by mixing onion powder, garlic, oregano and a little mint).
This was a delicious and healthy Mediterranean meal that I will definitely make again. I had some leftover barley I did not put in the salad and with it's nutty flavor, I am planning to try it for breakfast with a little milk, brown sugar, honey and almonds. YUM!

Happy Eating!

Sunday, July 31, 2011

Visual Inspiration

Ever since I started this blog I have gotten into the habit of taking pictures of almost everything I cook and/or eat. Unfortunately, I don't have enough time to write a blog about everything I cook. As I was looking through some pictures today, I realized I had photographed a lot of meals recently that might be worth sharing. (I also realized I desperately need a new camera!) So this became more of a visual post. All of these recipes are simple and require few ingredients. Maybe this will inspire you to cook something pretty (and inspire me to take better pictures??)

Grilled Citrus Chicken in lettuce wraps with avocado and mango salsa


Steamed salmon with Rosemary and a side salad made of spinach, beets, artichokes, goat cheese and balsamic vinegar. All of these foods are very good for your liver!! 


 Edamame lomein with carrots, red pepper and sesame seeds. So delicious, easy and inexpensive!


This meal was grilled BBQ chicken pizza with a blue cheese side salad. I got a little adventurous and mixed some hot sauce with some balsamic vinegar dressing to toss the lettuce in. It ended up being pretty good!


Cajun tilapia with okra and baby tomatoes from the farmers market!! So simple, yet so good!

Happy Eating!

Sunday, July 17, 2011

Summer Pastas

It seems like the summer is just flying by! I love this time of year, but we always stay so busy it goes by too fast. Between the vacations, weddings, showers, cookouts and other parties, I like to go to the farmers markets and then make up a meal with whatever looks good that day. One easy thing to do is mix some fresh veggies with fresh herbs and pasta. Here are a few pastas I made this summer that I think are worth sharing:

Eggplant Ragu
- Eggplant, peeled and cut into cubes
- tomatoes, chopped
- black olives, sliced
- dried thyme or oregano
- salt and pepper
- 2 cloves garlic, pressed or minced
- fresh basil leaves torn
- about 8 oz. angel hair pasta
- cheese for topping
Begin by sauteing the garlic in 2 tbsp olive oil over medium heat. Add the eggplant and cook for another two minutes.Add in tomatoes, olives, dried herbs, salt and pepper. Cook for another few minutes, until the eggplant is soft.  Meanwhile, cook the pasta to al dente. Just before serving, stir the torn basil leaves into the ragu. Place the ragu on top of the pasta and top with cheese if desired (I went with parmesan here).


Shrimp and white wine pasta
- 2 tbsp butter
- about a pound of peeled, deveined shrimp
- 2 colves garlic, minced
- green bell pepper, cut into chunks
- crimini mushrooms, chopped
- salt and pepper to taste
- about 8 oz cooked spaghetti (I used whole grain)
- fresh dill
- cheese for topping
Start by sauteing the garlic in the butter. After a minute, add in the bell pepper and mushrooms. Turn up the heat and pour about a 1/4 c white wine into the pan. Add the shrimp and cook for about 2 minutes per side or until pink. Stir in the salt and pepper and fresh dill. Top cooked noodles with shrimp and veggie mixture. Top with shredded cheese (I used romano for this dish).

Happy Eating!

Sunday, June 12, 2011

A Caribbean Feast!

Every year starting on the memorial day weekend we take a week long beach trip with several of our closest friends. This tradition started when we all went on our post-high school graduation beach week trip way back when. We look forward to this trip all year long and have so much fun relaxing (and partying) by the sea!

One of the many traditions we started on this annual beach extravaganza is how we do dinners. Each night a couple cooks a meal for the whole house. We all rotate and then we each only have to cook once. We love doing this and in recent years have started adding signature cocktails to go along with the amazing dinners we have! This year Ryan and I decided to do Caribbean night and came up with what I thought was an outstanding meal.

We started with a salad of papaya and avocado. I cheated and used the canned papaya to make it easier, but it was just as good. I dressed it with a simple mixture of fresh orange, lemon and lime juice and soy sauce.
 My favorite part of the meal was the jerk chicken. I have an awesome recipe for jerk chicken, but that recipe will be remaining my little secret :-)
For the sides (and the main course for the vegetarians) I made coconut red beans and rice and glazed sweet potatoes. For the rice I started by sauteing garlic, red onion and a diced habanero pepper. I added in the rice and browned it slightly before adding in the coconut milk, vegetable broth brown sugar and red beans. I then let it simmer for about 20 minutes until all the liquid is absorbed.
For the sweet potatoes, I just cut them up and glazed them with a mixture of lime juice, honey and Caribbean spices.


 For our signature cocktail we made Rum Apple Punch which was such a hit I did not even get a picture!

This whole meal was pretty easy to make and everyone seemed to really like it! We threw on some tropical tunes and Ryan wore his Hawaiian shirt and we made it a party!

Briana enjoying a sweet potato (before throwing it at uncle Trey!)


Happy Eating!

Tuesday, May 24, 2011

Chicken Pasta Salad

Several months ago I purchased a book called Food Cures. It lists out several ailments a person might have, and then details all the foods you should eat (and those you should avoid) to help with the health issues. It is an intriguing book that really focuses on the healing powers of food and your diet. There are also about 50 different recipes provided for breakfast, lunch, dinner, dessert and snacks. I have slowly been cooking my way through the book and have been loving the recipes! Most of them are practical, easy and surprisingly tasty! Recently I was craving something comforting (but still healthy) and I found this recipe. It proved to be just that and was even good as we ate it for leftovers through the week!

Chicken Pasta Salad
- 6 oz whole wheat pasta (I used shells)
- 2 tablespoons canola mayo
- 2 tablespoons low-fat plain yogurt
- 2 tablespoons red wine vinegar
- 2 tablespoons parmesan cheese
- 1 clove garlic, minced
- 3 cups shredded cooked chicken
- 1 cup cherry tomatoes halved
- 1/4-1/2 cup kalamata olives, chopped (or halved)
- 2 cups arugula

Cook the pasta until al dente. Meanwhile, in a large bowl whisk together the mayo, yogurt, vinegar, cheese and garlic. Add the chicken, tomatoes, olives and arugula and toss gently to coat. When the pasta has drained, let it cool slightly then gently toss with chicken mixture. Chill and serve.

This is a great addition to any summer cookout or luncheon. It's a much healthier pasta salad option with whole-wheat pasta and nutrient dense tomatoes, arugula and garlic.


Happy Eating!

Monday, May 16, 2011

Banana and Chocolate Quesadilla

I have never had much of a sweet tooth. I usually prefer something salty, cheesy or crunchy. However, I am human and do crave something sweet and chocolaty from time to time. The other night I wanted something warm and sweet so I took a Paula Dean recipe I found and figured out how to make it healthier (start by cutting all that butter out! haha). It is so easy and it turned out to be delicious, healthy and inexpensive so I had to share!


Banana and Chocolate Quesadilla 
- 1 Banana, sliced in rounds
- 2 whole wheat tortilla's
- a handful of chocolate chips (go with dark chocolate - at least 65% cocoa to get the
best antioxidant boost)
- about 2 tablespoons brown sugar
- about a tablespoon cinnamon
- about 1.5 tablespoons butter
- vanilla frozen yogurt

Start by melting half the butter in a skillet and sprinkle in some cinnamon. Lay one tortilla down and lay the banana slices on the tortilla. Top with brown sugar, chocolate chips and cinnamon. Top with second tortilla and cook until the chocolate melts. Put remaining butter and cinnamon in the pan as you flip the tortilla. cook until crispy. Serve with a scoop of frozen yogurt and enjoy!
This dessert was so good and full of nutrients in the tortilla's, banana's, chocolate and the yogurt!

Happy Eating!

Saturday, April 23, 2011

Grill me Something Good!

I love this time of year when the whole neighborhood starts smelling like a backyard cookout . There is just something to be said about the taste and smell of food cooked on a grill! However, when most people think about grilling, they think about hamburgers, hotdogs, steak, chicken, etc. Now don't get me wrong, these things can all be amazing on a grill, but they are often loaded with saturated fats, cholesterol, preservatives, additives, hormones, etc. We made an awesome vegetarian meal on the grill the other night and didn't miss the meat at all. We still got to enjoy that wonderful grill flavor, but in a much healthier way.

Grilled Stuffed Portabello's with Sweet Potato "chips"
- large portabello caps for stuffing
- chopped tomatoes (depending on how many you shrooms you plan to stuff)
- sliced olives
- fresh mozzarella sliced into rounds (the fresher the better, trust me)
- olive oil
- balsamic vinegar
- fresh basil leaves, roughly chopped
- Sweet potatos
- cumin
- cinnamon
- chili powder
- S&P to taste

Start by marinating the mushroom caps in a mixture of balsamic vinegar and olive oil for about 30min-1hour. Next mix the chopped tomatoes with the basil leaves and olives. Spoon the mixture into the mushroom caps and top with the mozzarella.
In the mean time, slice the sweet potatoes into about 1/4 in thick rounds. Toss them with a little olive oil, cumin, cinnamon and chili powder (I just mix the spices until it tastes right to me, equal parts usually gives a good flavor).
Next fire up the grill and put the sweet potatoes on first. Those will usually take about 7-8 minutes per side (or until they are fork tender). Next add the mushrooms (I recommend using a grill basket with cooking spray so they don't stick to the grill) and cook for about 10 min. or until the cheese is melted and bubbly.

This meal was very tasty and the meaty texture of the mushrooms leaves you feeling satisfied. The mushrooms have immune boosting properties, the tomatoes give you a healthy dose of heart-helping lycopene, the sweet potatoes are loaded with vitamins and the rest just tastes good ;-)


Happy Eating!

Monday, April 18, 2011

Chili Roasted Salmon with Cilantro-lime cream

Well it has been over a month since my last post, but it seems like even longer since I was able to cook something worth blogging about! Ryan and I just recently purchased our first home and immediately went to work upgrading our kitchen. We traded out the white laminate counter tops for some beautiful granite ones. We went with all new stainless steel appliances and even had a gas line put in so I could cook with a gas stove! Lastly we upgraded the fixtures on the cabinets, got a new sink and faucet and a new lighting fixture for the ceiling. It seemed like it took forever, but it was totally worth it. I. am. in. love.
Inspired by my new kitchen, I re-found (I think I just made that word up) this recipe in my collection. I was excited to try it because we love salmon, but get bored with it sometimes. Let me tell you, this was anything but boring! I will definitely be making it again through the spring and summer!

Chili Roasted Salmon with Cilantro-lime cream
- 1 fresh lime
- 2 cloves garlic, diced
- 2 teaspoons chili powder (more or less depending on how spicy you want it)
- 2 teaspoons ground cumin
- olive oil
- salmon fillets
- about a fourth a cup corn (I used frozen because I had it)
- 1 red bell pepper, thinly sliced
- 1 poblano pepper, thinly sliced
- 1 red onion, thinly sliced
- salt and pepper
- about 1/3 cup light sour cream
- fresh chopped cilantro (I used a ton because I looove cilantro)
Preheat your oven to 425 degrees. Mist two baking sheets with cooking spray. Mix together the juice from half the lime, garlic, chili powder, cumin and 1 teaspoon olive oil. Add salmon, turning to coat.
Next toss the corn, bell pepper, poblano and onion with about 2 teaspoons olive. Transfer veggie mix to baking sheet and spread evenly into a single layer.
Remove the salmon from the marinade and arrange on the second baking sheet. Drizzle the corn mixture with any remaining salmon marinade. Season salmon and veggies with salt and pepper and roast 8-10 minutes or until the fish is just cooked through and the veggies are tender.
In the meantime, mix together the sour cream, cilantro and remaining lime juice. To serve, spoon veggie mix on to plates, top with salmon and drizzle cream over fish.

This meal was so good! I loved that it was colorful, flavorful and bursting with nutrition!!!


Happy Eating!!!

Monday, March 14, 2011

Roasted Tilapia and Potatoes with Lemons and Olives

I am always looking for new and different ways to prepare fish. Fish is a very nutritious, lean protein and when made well, it is quite delicious. I have been in the habit of cooking salmon at least once a week, but I have been getting bored with that lately. Tilapia is a good mild fish that really takes on the flavor of whatever you cook it in. I found the recipe below and it was a tasty way to mix it up a bit. You could also make this meal with halibut or any other white fish you prefer.

Roasted Tilapia and Potatoes with Lemons and Olives
- about a pound of small potatoes (I prefer red skin) quartered
- 1 lemon thinly sliced
- several springs of fresh thyme
- 2 tbsp and 1 tsp olive oil
- a handful of pitted kalamata olives
- tilapia fillets
- paprika
Start by preheating the oven to 400 degrees. On a large rimmed baking sheet, toss the potatoes, lemon, thyme, 2 tbsp of oil and salt and pepper. Arrange in a single layer and roast tossing once, until the potatoes begin to soften, about 20 minutes. Next toss the olives into the potato mixture and nestle the fish in the middle of the mixture. Drizzle the fish with the tsp olive oil and sprinkle with paprika, salt and pepper. Continue to roast the mixture until the potatoes are golden brown and crisp and the fish is cooked through, about 12-15 minutes more.

The lemon and thyme really pull this dish together. Potatoes have been given a bad wrap for having carbs, but they are actually full of fiber and vitamin C and are a good source of B6.

Happy Eating!

Monday, March 7, 2011

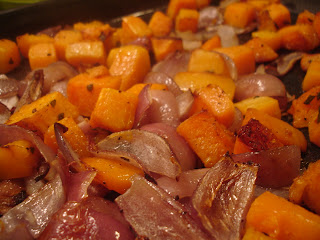
Roasted Red Onion and Butternut Squash Rigatoni with Fontina

I love pasta. I always have. It can be difficult to find a pasta recipe that not only tastes good, but is good for you. Many of the traditional pastas we grew up eating tend to have empty carbs and very low nutrition. Over the past couple of years, I have come across some delicious out of the box pasta dishes that provide the comforting satisfaction from pasta, but offer much more from a nutritional standpoint. Here is one recipe I tried that turned out delicious!

Roasted Red Onion and Butternut Squash Rigatoni with Fontina
- a large butternut squash peeled and cubed
- 2 red onions, cut into small wedges
- 1 clove garlic minced
- fresh sage (about a tbsp chopped or more if you like)
- tbsp olive oil
- Whole wheat rigatoni pasta (about 1/2 lb.)
- shredded fontina cheese (about 1/4 cup)
- salt and pepper
Preheat the oven to 450 degrees. Place squash, onions, sage, garlic, olive oil, salt and pepper on a lined baking sheet. Toss well. Roast in the oven for about 20-25 minutes, or until fork tender. Meanwhile, cook pasta according to directions. Set aside a 1/2 cup pasta water. Drain the pasta and return to the pan. Mix in vegetables, cheese and pasta water.

This dish is only about 380 calories a serving. Red onions have antibacterial properties and are good for your bones. Your heart will love you if you eat butternut squash. Whole grain pasta keeps you full and your stomach happy. And the cheese? well...its just delicious ;-)


Happy Eating!

Wednesday, March 2, 2011

Peanut Coconut Curry

Tonight I decided to play around with some Thai flavors and came up with a delicious peanut coconut curry. It tasted so rich and creamy, but is actually a very healthy meal! I am not very familiar with cooking Thai food so this was definitely an experiment for me. I read a few recipes for similar meals and then (as I always do) I made it my way based on my preferences and what I had available in my kitchen.

Peanut Coconut Curry
- small clove garlic minced
- 1 inch piece ginger, minced
- tbsp olive oil
- 1/3 cup peanut butter (creamy or crunchy)
- 12 oz can lite coconut milk
- a large red bell pepper, chopped
- white button mushrooms, quartered
- carrots (you could cut them, but I had shredded in my fridge and they worked really well!)
- curry powder
- chili garlic sauce (to taste)
- chopped scallions
- Cooked quinoa (you can use rice too, I used quinoa for the extra protein)

Start by heating the oil, garlic and ginger in a large skillet. Next add the red pepper and carrots and cook just a couple of minutes until they soften. Add the mushrooms and cook for another minute or two. Add curry powder to vegetable mixture. Meanwhile, in a small sauce pan wisk the coconut milk, peanut butter and chili garlic sauce until heated and well blended. Pour the peanut coconut mixture over the vegetables and allow the mixture to simmer for a minute or two. Serve over quinoa and top with chopped scallions.

When I made this, it could have used a little more heat and next time I might add basil to the mix. Other than that it was easy, healthy and very delicious! The cool thing about this is that you can really adjust the recipe to meet your tastes and the ingredients you have on hand.


Happy Eating!

Sunday, February 27, 2011

Beauty Food

This winter weather has been absolutely brutal on my skin. I'm itchy and dry and I look like kinda like Casper. Recently I decided to try some various homemade skin treatments (mostly because I did not feel like going anywhere to buy one ;-) and I ended up finding some great recipes for the spa treatment at home! The best part is that all of the ingredients for these treatments can be found in your kitchen and they are much more gentle on your skin than many of the harsh chemicals found in store bought skin care products. While these may not be recipes for eating they are made out of food so I decided to share them:

Cleaning your skin:
Exfoliant - mix 1 tbsp baking soda with enough water to form a paste. Add a couple drops of lemon juice and gently rub all over face. Rinse with warm water.

After you clean your face, try one of these masks: 
Oily skin - mix 1 tbsp honey, 1 egg yolk and mix in enough oatmeal to form a thick paste. Spread over face and rinse with warm water after 5-10 minutes.
dry skin - mash 1/2 banana and mix with 1 tbsp honey and 2 tbsp sour cream. Allow to sit for 10 minutes and gently rinse with warm water and splash with cold.
Blackheads - beat an egg white with a few drops of lemon juice and spread over your face. Rinse with warm water after 5-10 minutes.
Cooling mask - mix 1/2 cup greek yogurt,1 tbsp honey, chopped fresh mint leaves and a small amount of a pureed cucumber. Spread across face and rinse after 10 minutes

Skin Toner: Grate a cucumber and place in a sieve over a bowl to collect the juice. Add a few drops of lemon juice and use a cotton ball to apply to face. This will tighten skin and increase circulation to the area.

Other homemade beauty ideas:
- put a couple of green tea bags in the tub when you take a bath. The antioxidants are good for your skin too.
- for a quick hair mask, coat hair in mayonnaise and allow to sit for about 30 minutes (put on a shower cap if you have one). Slowly rinse the mayo out with beer and then gently shampoo. Sounds gross, but your hair will be so silky and shiny!

I decided to spare you the image of what these masks looked like on, so I do not have any pics for this post. But I can tell you the treatments worked pretty well, felt great and cost next to nothing. Hope you enjoy them!

Happy Eating.... or treating, or Masking...;)

Thursday, February 17, 2011

Not Your Average Salad!

When most people think about eating healthier, the first thing they think about eating are salads. A salad is a great way to get low calorie, low fat, low carb, low everything meal with lots of vitamins and antioxidants. Sounds great, but the problem is that salads can get old and boring very quickly. They can also be unsatisfying when you are craving something hearty, warm and delicious (which is just about everyday for me ;-)
In my journey to eat healthy, I have come across some pretty amazing salads and some that are less than desirable. Here are a few of my favorite salad recipes that have a lot of filling, satisfying flavor but are still good for you.

Southwestern Quinoa Salad:(This salad is not only satisfying, delicious, healthy and easy... it's also vegan)
- a half a cup cooked quinoa per person you are serving
- about a teaspoon of olive oil
- small clove garlic, minced
- chipotle chili powder (about a teaspoon or more if you like spicy)
- one diced onion
- diced red pepper
- black beans
- corn
- chopped avocado
- salsa (for dressing)
Heat olive oil in a skillet and begin cooking the onion and garlic. Once the onion softens, add the diced red pepper and chipotle chili powder and cook until tender crisp. Stir in black beans and corn until warmed through. Assemble by putting quinoa on a plate and topping with the black bean mixture. Add avocado and salsa on top. Enjoy!


Cobb Salad with Poached Egg
- mixed greens
- bacon (cooked and crumbled)
- 1 large tomato diced
- cooked, diced chicken (I usually save some from a previously cooked chicken dinner)
- crumbled blue cheese

- small amount of mustard vinaigrette (make your own with olive oil, red wine vinegar, mustard, S&P)
- Eggs (enough for each salad serving to have one)
Top the mixed greens with the bacon, tomato, chicken and blue cheese. Toss lightly with small amount of vinaigrette. Gently poach one egg per salad you are serving, remove with a slotted spoon and place on the salads. The yolk of the egg acts as a part of the dressing and is very indulgent tasting. It also adds a warm element to a usually cold salad. I really love the blue cheese in this salad! 

Chicken, Pear and Goat Cheese Salad:
- Chicken breast
- Spinach or any other mixed greens
- Sliced pears - any kind should work
- Cucumber, lightly peeled and sliced into half moons
- Crumbled goat cheese
- Walnuts
- Raspberry vinaigarette
Start by marinating the chicken in some of the vinaigrette (save the rest to dress the salad). Place the spinach on serving plates and top with sliced pears, cucumber, goat cheese and walnuts. Next grill the chicken until cooked through and allow to rest off the heat for a few minutes. Slice the chicken and place on top of each salad plate. Finish the salad with a drizzle of the raspberry vinaigrette and enjoy!

I think one of the key things these salads offer that makes them so good is some type of warm food. There is something satisfying and filling about eating warm foods that we can often miss when eating cold salads. If you decide to try these salads you won't be disappointed!

Happy Eating!
-

Sunday, February 13, 2011

Loveable food!

I love Valentine's day! Even when I was a kid it was one of my favorite holidays. I can remember how great it was coming home from school and finding my bed covered in conversation hearts, chocolates and a nice card from my dad. Even when I was older and single I enjoyed valentines day. Any holiday dedicated to the concept of love is good by me!
The first year Ryan and I were together for Valentines day, he took me out to a nice Italian restaurant where we fought the crowds, paid too much and found it hard to enjoy each others company. The following year we started a tradition and now every year Ryan makes me an amazing homemade dinner of Chicken Marsala. It is always sooo delicious and with a few candles and a bottle of wine we have quite an intimate stress free Valentine's meal together! This year I decided to add to the tradition by offering to making a delicious dessert. I knew I wanted something rich and chocolate-y and I found the recipe below which sounded perfect.


Espresso Chocolate Molten Cakes
- Two 6 oz ramekins
- 4 tbsp unsalted butter plus more for the ramekins
- 1 tbsp flour, plus more for dusting the ramekins
- 1/3 cup chocolate chips (use dark chocolate chips for an antioxidant boost)
- 1 large egg plus 1 large egg yolk
- 2 tbsp granulated sugar
- 1 tsp instant espresso powder
Heat the oven to 450 degrees. Butter the ramekins and dust with flour. Place the butter and chocolate in a glass bowl and microwave on high in 20 second intervals, stirring after each, until melted and smooth. Using an electric mixer, beat the egg, egg yolk and sugar in a medium bowl until thick and lighter in color, about a minute. Add the melted chocolate mixture, flour and espresso and beat until fully incorporated and smooth. Divide the batter between the prepared ramekins. Bake until edges are set and center still jiggles slightly, 8-10 minutes. Let stand for 15 seconds. Run a knife around the edge, then invert each cake onto a plate.
I am going to serve them with a really good vanilla ice cream and maybe a drizzle of caramel.

Also, I found this cool romantic Valentine's meal planner on Epicurious today. You just answer a few questions and it gives you menu suggestions. So if you want to impress someone you love, give it a try!

Happy Valentine's day and Happy Eating!

Monday, January 31, 2011

In Loving Memory

 On January 14th, 2011 the world lost an amazing woman. My mother-in-law Michele, was a friendly, funny, warm and loving person. She was the kind-of mother-in-law every woman hopes for. She welcomed me right into the family and told me she would always be there for us, but would never butt in. She often told me she wanted to be the kind of mother-in-law to me that her mother-in-law had always been to her.  Michele and I had a lot in common and I will miss her dearly.
Even though I only knew Michele for 4 years, we made some really good memories together. One of my favorite memories was a night shortly after Ryan and I got engaged we went to visit his parents. I had called Michele and asked to see some baby pictures of Ryan and when we got to the house she had pulled out two huge bins of pictures and two bottles of wine. We laughed and cried and managed to get through both bins of pictures and both bottles of wine that night! 
At our wedding shower, Michele gave us a gift that I will always cherish. She spent 8 months creating a family cookbook she called "Shannon Secrets to Good Eating". She gathered her favorite recipes from family and friends, organized them, and put them all in a book for us. In memory of her, I have listed a couple recipes from the cookbook that I like the most. These recipes will always have a special place in my heart.

Gazpacho Soup
This past summer, Ryan, Michele and myself went to a Dave Matthews concert. It was the middle of summer and of course, we wanted to tailgate all afternoon. It was scorching hot outside and Michele offered to make this soup instead of us doing the usual grilling. She made this gazpacho and it was so delicious and refreshing. I love gazpacho and every time I eat it I will be reminded of the fun memories we made tailgating and going to the concert that day.
- 4 large tomatoes chopped
- 1 onion minced
- 6 pitted olives
- 1 cup low sodium tomato or V8 juice
- 1 cucumber chopped
- 1 green pepper seeded and diced
- 1 clove garlic
- 1 tablespoon white wine vinegar
- salt & pepper
Mix all together and season with extra salt & pepper to taste. Chill several hours and mixture will thicken. Spoon into bowls and garnish with extra olives if desired.


Sour Cream Chicken
This was one of the first meals Ryan ever made for me and one of the first meals Michele taught Ryan how to make. It's a delicious meal that is easy to prepare. I hope to pass it along to my own kids someday.
- Chicken breast (enough for everyone eating)
- White mushrooms, sliced
- 1 can cream of mushroom
- enough cooking sherry to fill up half the empty cream of mushroom can
- 1 large container sour cream
- paprika
Place chicken in shallow cooking dish. Mix all ingredients and pour over chicken. Bake at 350 degrees for an hour (or until chicken is cooked through). Ryan always served this to me with a side of angel hair and peas.

Michele's addictive, to die for dessert
 When Michele made this dessert for me she warned me that it was completely unhealthy, absolutely addictive and ridiculously good. I had no idea how difficult it would be to stop eating it! It is such an indulgent blend of salty and sweet. Her, Ryan and I finished almost a whole batch of this in one day! If you make this, be sure to pace yourself!
- sleeve or two of saltines
- 2 sticks butter
- 1/2 cup sugar
- cup or so of white chocolate morsels
- toasted almond slices
Place a layer of saltines on the bottom of a cookie sheet. Melt the butter and sugar until it starts to brown. Add the white chocolate morsels and melt. Pour over the saltines and top with toasted almonds. Bake at 350 degrees for 10 minutes. Refrigerate for an hour or two. Break into pieces (like peanut brittle) and try not to inhale immediately.


These are only a few of about 50 recipes in this cookbook.When I decided to write this blog, I knew it would be hard. I wanted to do it though to honor her memory and I have to say, going through these recipes and asking my husband about them has brought about some great family stories and funny memories. The hardest part was reading the letter she wrote to us at the beginning of the cookbook. I have inserted a picture of this letter below.

Our family will never be the same without Michele. We will always miss her and wish we had been given more time with her. I am grateful for the relationship I had with her and the memories we made. I am so glad to have this gift from her as it is a great reminder that her spirit is always with our family.


Sunday, January 9, 2011

Taco truck Takos

This past summer, we discovered the most awesome farmer's market about a mile away from our house. Every Saturday morning, we would get up, put the dog on the leash and walk to the market. We would load up on fresh berries, veggies, homemade pastas, jams, gelato, soaps and meats. One of the greatest parts of this weekly trip was the last stop at the taco truck. The taco truck would park on the edge of the market where we would place our orders and wait impatiently in the shade for the amazing tacos we were about to eat. Now these are not your average taco bell style tacos. They offer pork, chicken, beef and tofu tacos made American, Asian or Mexican style. You can also get fish tacos, duck egg tacos, pork belly tacos among other amazing creations. With all these great choices, I found I liked the pork or chicken Mexican tacos the best. In fact we liked them so much, our good friend Trey figured out how to replicate these tacos at home. While they are not exactly the same as the tacos fresh off the truck, they are still a delicious reminder of our Saturday market breakfasts!

Taco Truck Takos  (for best results, a crock pot will be needed)
- Pork tenderloin (or chicken breasts)
- 1 corona (or other similar beer)
- small chopped onion
- 2 limes
- purple cabbage, chopped
- Hot sauce
- sour cream
- Chipotle peppers in adobe sauce (can be found at most grocery stores)
- small corn tortilla's 
Start by placing your pork or chicken in the crockpot with the onions, beer and juice from one lime. Let this cook on low for 6-8 hours or high for 4 hours until it is very tender. Next, marinate your cabbage in the juice from one lime and hot sauce to taste (depending on how hot it is, a tablespoon should be good). Put a couple chipotle peppers into a small food processser with a cup of sour cream and blend (Add more peppers for a spicier, smokier flavor). Wrap the tortillas in foil and heat in the oven for about 10 minutes. To assemble your taco, top a corn tortilla with meat, sour cream chipotle sauce and cabbage. You can serve these with a side of rice and beans and corona, dos equis or budlight lime.
 Happy Eating!

Tuesday, January 4, 2011

Summer meals on winter nights

I have always been a summer girl. I try my hardest not to complain, but there is really nothing positive I can say about cold weather. Sure the holidays are great and snow can be fun, but I would take 85 degree days all year long if I could.
When it starts to get really cold outside (I mean so miserable-your-nose-freezes-on-your-face cold) I like to occasionally cook summer meals to remind me of my beloved warmer months. I have been trying to focus on cooking with ingredients that are currently in season, but sometimes I just need to be reminded that summer is not far away. The two recipes I have listed below are colorful, cheery and the smells of the ingredients always remind me of sunny summer days.

Island Chicken
- Chicken breasts (enough to feed everyone you will be feeding ;-)
- red bell pepper
- orange bell pepper (or green or yellow)
- jerk seasoning (any kind will work, if you don't have this seasoning, you can also use paprika)
- can of organic pineapple chunks
- avocado chopped up
- cooked rice (I think basmati goes well with this recipe, but brown rice is a healthier alternative)
Preheat the oven to 375 degrees. Start cooking rice in rice cooker (or stove top according to directions). Cover both sides of chicken breast with seasoning and lay in the bottom of a baking dish. Chop up the bell peppers and throw in the pan. Open the pineapple and drain about 2/3 of the pineapple juice. Pour the pineapple chunks and juice over the chicken and peppers. Put in the oven for about 20 minutes. Pull from the oven and flip the chicken over. Cook for an additional 15-20 minutes (or until chicken is cooked through). Serve chicken, vegetables and pineapple over rice. Top with avocado.
This meal is soooo good and very healthy. The chicken provides lean protein and iron, the avocado provides a good dose of healthy fats, the peppers are full of antioxidants and the rice is a good source of whole grains. Once you try this, I bet it will become a regular in your household!


Halibut taco's with mango salsa
- halibut fillets (enough to feed everyone - about 1 fillet per person)
- 1 teaspoon ground cumin
- about a tablespoon olive oil
- 2 cloves garlic, minced
- salt
- 3 tablespoons lime juice
- 1 ripe mango, peeled, seeded and chopped
- 1/2 a red bell pepper, chopped
- 1/2 a jalepeno, chopped (cut this last! They can burn and get all over everything...)
- a bunch chopped cilantro
- soft corn tortillas
- shredded lettuce (or cabbage)
Start by preheating your broiler. Coat your broiling pan with cooking spray. In a bowl combine the fish with the oil, garlic, cumin, salt and 1 tablespoon lime juice. Let stand 15 minutes.
In another bowl combine the mango, bell pepper, jalapeno, cilantro and the rest of the lime juice.
Wrap tortillas in foil. Remove fish from marinade and place on broiler pan. Broil until opaque - 3 to 6 minutes. Place the tortilla's in the oven for about a minute or two. Flake the fish. Top each tortilla with lettuce, fish and salsa.

Most people who are not familiar with fish taco's think they sound strange. But I assure you they are so good and tasty! Halibut is a fatty fish with a great dose of omega-3 fatty acids. Mango has a ton of beta-carotene and the red peppers have plenty of antioxidants. It is also low calorie and high flavor!

Both of these recipes are light, very healthy and they remind me so much of summer. It may be harder to get the ingredients this time of year, but it will be more than worth it!

Happy Eating!

Sunday, January 2, 2011

Elegant Vegetarian Entrees

The more experience I get in the kitchen, the more I realize that the most elegant creations have the most simple ingredients. The old cliche' "less is more" holds true here. It's all about showcasing and matching delicious, high-quality ingredients and really appreciating the flavors. I have a couple of vegetarian entrees listed below that do just this. Delicious, uncomplicated ingredients that allow you to really appreciate the elegant flavors of the meals.

Polenta with roasted Tomato, Garlic and Basil sauce
- roll of organic prepared polenta (I used this to save time, but if you have some time here is a recipe for preparing the polenta yourself. It's pretty easy and really good!)
- about a pound of cherry tomatoes
- 3 garlic cloves
- couple handfuls of fresh basil
- 2 tablespoons of olive oil for pan frying
- Gorgonzola cheese (for sprinkling)
* peel the garlic cloves and slice in half. Place them on a roasting pan with the tomatoes and roast for about 15-20 minutes at 350 degrees. Pull from the oven and allow to cool. Next, slice the polenta into rounds and heat the other tablespoon oil in a pan. Gently pan fry the polenta rounds until they are crispy on the outsides (Note: you can also grill the polenta for a slightly different texture). Put the roasted tomatoes and garlic in a food processor with the basil. Gently pulse until the mixture forms a sauce. Heat the sauce on the stove and stir in salt and pepper to taste. To serve top each polenta round with sauce and Gorgonzola cheese.

This was so delish! We ate this with a side of roasted rosemary asparagus. As far as wine goes, I would pair this with a Chianti or maybe a Pinot Noir.


Pumpkin dumplings with Parmesan cheese
- 1/2 cup pumpkin (I used organic canned pumpkin but you can also use fresh if you have it)
- 1/8 teaspoon salt
- about a half teaspoon nutmeg
- 1/8 teaspoon baking powder
- 1/2 cup flour (use whole wheat for a healthier option)
- 3 tablespoons butter
- 1/2 cup Parmesan cheese
Whisk together the pumpkin, egg, salt, nutmeg and baking powder in a large bowl. Slowly mix in the flour to form a soft dough. Boil a large pot of water and add a bit of salt. Carefully scoop and drop a teaspoon of the dough at a time into the boiling water until all the dough is used. Allow the dumplings to boil for 10-12 minutes and then strain in a colander. In a large skillet melt the butter and sautee the dumplings for 7-10 minutes or until lightly browned. Sprinkle with Parmesan cheese and serve hot. You could eat these with roasted butternut squash or steamed broccoli.
I would also recommend pairing this recipe with a light sparkling white wine. I think Prosecco would be a nice accompaniment. I do not have a picture of this meal (I really need a new camera!) but it doesn't matter what it looks like as long as it tastes good!

Both of these recipes are pretty easy and do not take much time to make. They are filling and provide healthier alternatives to eating a large meat entree. Remember, you don't need elaborate complicated ingredients and techniques to make elegant meals!

Happy Eating!